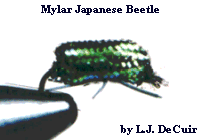
Mylar Beetle

Tied by L.J. DeCuir, decuir@utkvx.utk.edu
NOTES:
Recently after a day of fishing the South Holston I dropped by Mahoney's
in Johnson City, TN to pick up a few items and check on the latest information.
I happened to glance at their tying desk and there was a really great
looking Japanese Beetle and an excellent June Bug. When I asked about it
George was kind enough to give me the details on a quick, very effective
Beetle Pattern so I thought that I'd share it with the rest of you.
MATERIALS:
It is very simple using just some braided mylar tubing, rubber
legging material, a foam body and a magic marker. I'll give you the
recipe for the Japanese Beetle and then you can vary the color to make
June Bugs, etc. For the Japanese Beetle take some pearlescent braided
mylar tubing and color it with an ordinary black magic marker. Quickly
wipe off the marker and you will be left with tubing in a gorgeous Japanese
Beetle mix of colors.
TYING INSTRUCTIONS:
To turn this into a Beetle you then need the
appropriate size hook, black thread and a foam body in the appropriate
size and shape. The foam body can be purchased pre-shaped or you can form
your own. Take the foam body and skewer it onto the hook and secure it in
place with a little CA glue. It does need to be glued in place on the
hook or it will twist on you later creating problems. It should be secured
so that the back of the body is right at the bend of the hook, but there is
space between the front of the body and the eye of the hook for the "head"
of the beetle.
Secure the hook in your vise in the usual manner. Take a couple of
turns of thread at the back of the body and let the thread dangle below
the hook. Slip the tubing over the eye of the hook and slide it to the
back so that the unraveled end protrudes beyond the thread. Take a couple
of turns of thread around the mylar to secure it in place behind the body
and whip finish. Then take a couple of turns of thread around the mylar in
front of the body to secure it in place and whip finish. Trim off the
excess tubing. Trim it very closely in the back, but leave a little of
the loose braiding in the front and shape it to form the "head".
Now turn the body of the beetle upside down in your vise. Cut
three pieces of rubber legging material 1" or more in length. They should
be long enough for you to work easily with them and will be trimmed to exact
length after they are glued in place. Put a dab of CA (Cyanoacrylate) glue
on the underside of the beetle body. Place the three pieces of legging
material on top of the CA glue so that they extend over both sides of the
beetle. I usually use two of them to form an X and then lay the third one
on crossways. After the glue has dried you can then cut the ends of the
six legs sticking out to the length that you desire. Note: do not use CA
accelerator to help dry the glue on the bottom of the beetle. This causes
the glue to turn opaque and ruins the look of the bottom.
Voila, you have an quick and very good looking beetle. It does
take a little bit of practice to get the tie offs on the mylar tubing
looking correct, but it is not too difficult. The first time that I tied
one (without ever having seen it done) I was able to turn out an acceptable
beetle. The second one was even better looking. You can play around with
different kinds of mylar tubing and different markers to get a wide variety
of colors and form the foam body in whatever size and shape you desire for
the beetle that you would like to imitate.
BACK TO TFS

